Hello and welcome, friends!
We’re continuing our discussion on getting started. Today, I will be guiding you through how to prep your materials for a project. Here is what we’ll go over:
- Choosing your pattern
- Prepping your embroidery hoop
- Transferring your design
- Using your thread
There’s a lot to go over so, let’s not waste time!
Choosing your pattern
Embroidery patterns are the focus of your entire piece. You can absolutely make your own, but there are also literally hundreds of free patterns available on DMC’s website. If you’re unsure of where to start, that could be a good place to go check out. While I design most of my patterns, I do like to purchase or download a pattern for fun!
When I first started, I would create all my designs by hand on paper. Now, I use ProCreate on my iPad, which makes things easier. But for just starting out, a pen, some paper, and your imagination will do.
To begin, I always trace the inside of the hoop that I am using with a pencil. This will leave me with a circle of space I know is “safe” for me to place a design into. Next, I will lightly sketch out my design with a pencil. This way, I can easily erase any mistakes I make. If you’re struggling with perspective or fonts, taking a reference picture or typing out a phrase can help immensely. When I get my design to a place that I’m happy with, I like to go over the pencil marks with a dark pen or permanent marker so that the lines are more saturated and defined. This will help with transferring your design!
If you choose to download a pattern, make sure to size it correctly so that it will fit into the hoop you are using.
Prepping your embroidery hoop
As we discussed in the previous blog, you must consider the size and the shape of your design when selecting the size of your hoop. If you are just beginning to learn embroidery, I would recommend starting with a smaller hoop and then working your way up to larger sizes. You do not want to overwhelm yourself with the design so, limiting the size will help.
I would recommend starting with a 4 or 5-inch hoop if this is your first rodeo!
Once we have our hoop ready, we can take our fabric of choice and lay it out on a flat surface. Take your hoop and position it on top of the fabric to see how much material is needed. When measuring this, ensure there is a 4-5 inch allowance of fabric around the perimeter of the hoop. You will need excess fabric to hold tension in your hoop as you work on your project.
Trim your fabric to size once you’ve determined how much you will need. You should be left with a square/rectangle of fabric with your 4-5 inch allowance.
Once you have your fabric trimmed to size, unscrew the bolt at the top of the hoop to loosen it. Separate the outer hoop from the inner hoop. Place the inner hoop under the fabric, centering it. Take your outer hoop and place it over the fabric to secure it around your inner hoop. Tighten the bolt of the top of the hoop. Gently, begin stretching your fabric by tugging on the excess fabric left out of what is secured by the embroidery hoop. Be sure to tighten the bolt as you go to ensure that the fabric is staying where you want it. If you move the fabric in a direction you’re unhappy with, you can always loosen the bolt to release some of the tension on the fabric.
You can test the tension of your fabric by tapping the center of your embroidery hoop. If the fabric is tight enough, it will feel like a drum head, and will bounce back into place. If there is some give left in the fabric, continue tugging it until it has the desired tension.
The final step in prepping your hoop is to trim some of the excess fabric. You still want about 2-3 inches around the perimeter of the hoop so you can still tighten it, if needed. Leaving too much excess can make it difficult to handle your hoop while you’re stitching. Trimming this will make your life easier.
Transferring your design
Once your embroidery hoop is prepped, it is time to transfer your design onto the fabric. There are many methods for this, but I will be teaching you, what I believe to be, the most beginner-friendly method. I call it the lightbox technique.
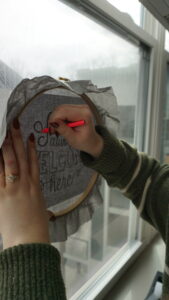 This technique involves layering your embroidery hoop, facedown over your finalized design and simply tracing it onto your fabric. If you have a real lightbox, that is great, but it is not required. You can also pull off this method by using a window or even just placing your hoop over your design on a flat surface.
For lighter fabrics (i.e., white, cream), doing this method on a flat surface works just fine. If you’re using darker fabrics (i.e., black, gray, textured), I would recommend taping your design to a sunny window. The extra light from the window will help you be successful when transferring onto darker fabric.
As discussed in the previous blog, Getting Started: What You Need to Embroider, there are many transfer tools. For the lightbox technique, I recommend using a transfer pen/pencil.
Line your hoop up, facedown over your design, making sure it’s centered correctly. Take your transfer pen/pencil and begin tracing over the darkened lines of your design. If your design is too light, you will not be able to see it through the fabric. This is why it’s important to outline your finalized design before this step.
Since you traced your design on the back of the fabric, you will need to reposition your design so that it’s now on the front of the hoop. Once you’ve successfully traced your design onto the fabric, you will need to loosen the bolt of the outer embroidery hoop until the fabric can come free. Flip the fabric so that the design is now laying on top of the inner hoop. Refit the outer hoop over the fabric and repeat the process of stretching your fabric back into place.
Take your time re-stretching your fabric. Since there is a design now, you want to make sure you don’t overstretch the fabric in one direction so that it warps the design. Slowly and surely, you will reposition the fabric to the desired tension.
Using your thread
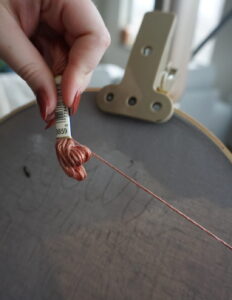 The last step I’ll share with you before beginning to stitch is how to use your thread. For embroidery, we mostly use six-strand embroidery floss. Like the name implies, the material is six individual strands of cotton wound together to make the embroidery floss. Rarely, will you actually use all six-strands at a time. The reason being is that you often double-up your thread. That is, you fold a strand in half when pulling it through your needle. For example, using two strands at a time, is actually going to look like four strands.
The number of strands used will determine the weight or thickness of your stitch. Keep that in mind when pulling your embroidery floss apart. For most projects, using two strands (i.e., four strands) provides good coverage, and is easy to maneuver. Three strands will provide even better coverage, while still being manageable.
Begin by pulling about an arms-length of thread from the skein and cut to size. I recommend pulling from the end that lists the color number to prevent knotting. Starting from the middle of the thread, gently pull apart 2 or 3 strands, taking your time as you separate them. Sometimes, the thread will get twisted and knot together. Be sure to go slowly, untangling when needed, until you have split your embroidery floss.
Once you’ve separated your embroidery floss, you can thread your needle.
Take one end of your embroidery floss and thread it through the eyelet of your size 5 needle. If you’re having issues with all your strands threading correctly, you can always dampen the end of your thread so your strands stick together. This will make threading your needle easier!
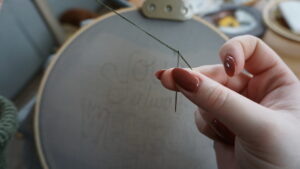
Pull your thread through the needle until you reach the middle. Fold your thread in half, aligning the ends. Tie off the ends of your threads, and trim off the excess so that you have just a knot. You will repeat this process MANY times throughout your project as you switch colors and replenish your embroidery floss supply. Again, you can change the thickness of your stitches by using fewer or more strands of thread at once. But keep in mind that you will be doubling up your thread with the method used for threading your needle.
After prepping all your materials, you are ready to begin stitching! Next week on the blog, we will be learning some stitches to get your started. Stay tuned!
What questions do you have? Comment below or fill out an instruction support form!
0 Comments