Hi, friends! This week is an introduction into some of my staple stitches.
Become an embroidery master by first learning the basics. This week, we are learning some tried and true staple stitches that will help you excel in this artform. These are embroidery stitches that I use in most projects, and are great to have in your “toolkit.” I will be including some instructional videos so that you can visualize what I am also writing about.
Back Stitch
One of my favorite and most-used, the back stitch is a versatile and approachable stitch to master. Use it for outlining shapes, and for creating straight and curved lines.
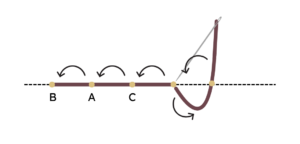
This is how to complete a back stitch:
- Work from right to left, or left to right—whichever you prefer. For this example, I will be working from left to right.
- Bring your needle up through the back of your hoop at point A, and then pull it back down again at point B.
- From behind your hoop, move your needle slightly to the right of point A, and come through the fabric to create a new placement (point C).
- Pull your thread back down into entry point A. This will begin to create a seamless line.
- Continue this pattern until you’ve completed your design.
Some tips for the back stitch:
- I like to use 2-3 strands of embroidery floss at a time. This seems to be the sweet-spot for full coverage, without the thread getting too tangled
- Hold tension in your thread to prevent it from getting tangled and knotted
- When working with curved lines or outlining shapes, use shorter back stitches (i.e., put less space between points A, B and C)
Satin Stitch
A simple, yet sophisticated stitch, mastery of the satin stitch is a great skill to have in your arsenal. Use this for filling in shapes with a solid color. This is especially useful for lettering and color blocking!
This is how to complete a satin stitch:
- I like to work from right to left with this stitch, but this is easily replicated from left to right.
- Beginning at the back of your hoop, pull your needle up through your fabric at one end of your design (point A) and then bring it back down at another end of your design (at point B).
- From the back of your hoop once again, bring your needle back up through your fabric directly to the left of point A, then pull it back down right next to point B.
- Make sure that there is almost no space between where you’re placing your stitches to create a solid, seamless effect.
- Repeat this process until you’ve completely filled in your design.

Tips for the satin stitch:
- Ensure that there is no twisting or bumps in your thread so that your stitches lay flat. This will create that solid, smooth look. To be successful with this, be sure to take your time.
- If you want to add some more dimension to your satin stitch, you can first outline your shape with a backstitch or split stitch and then apply a satin stitch over it. This will create a lifted, 3D effect to your design.
Leaf Stitch
This stitch is, perhaps, more complicated, but it has quickly become one of my most-used. The leaf stitch is a sort of neighbor of the satin stitch, involving layering stitches closely next to each other to create a solid, filled effect.
There are many ways to complete a stitch like this, and this method is by no means “traditional,” but this is how I like to embroider my leaves. It is effective and with practice, can be done very quickly. I would call this my most “trust the process” stitch–I promise, the final effect is worth it!
This is how to complete a leaf stitch:
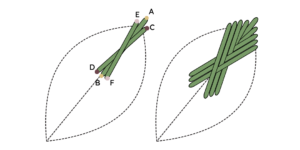
- Starting with your leaf shape, it is helpful to draw a line down the center so that you have a guide.
- Begin with bringing your needle from the back of your hoop and up through the tip of your leaf shape (point A).
- Bring your thread about ⅓ of the way down the center of the leaf shape (point B).
- Then, come back up towards the tip of your leaf and bring the needle through the fabric (point C) to either the right or left of point A.
- Pull your thread across the stitch that goes down the center of the leaf to point D.
- Bring your thread back to the other side of point A (point E), and repeat the same process from steps 4-5, but in the opposite direction, crossing your thread in the opposite direction.
- You will be left with a criss-cross effect. This will create a natural “center” to your leaf that resembles where a stem support would be. Keep repeating this process, following the shape of your leaf until you’ve reached the other end of the leaf.
- Anchor the end of your leaf stitch into the stem to finish your design.
Tips for the leaf stitch:
- Use your shape as your guide for where to place your next stitch and keep your stitches close together for a solid look.
- Don’t be afraid to cross your stitches over the majority of your leaf. The longer these criss-crossing stitches are, the flatter they will lay.
- If you want a more raised effect, you can always keep those criss-crossing stitches shorter.
- Trust the process–this might take you a few tries to master, but the end result is really lovely.
I will be sharing more of my Staple Stitches in the coming weeks. For now, practice these three. I’ve created a simple, downloadable pattern for you to use for practice. Reference my Getting Started series to prep your hoop.
Download the Practice Guide HERE!
As always, if you have questions, you can always submit an Instruction Support form.
Happy stitching!
0 Comments