It’s my birthday!
What better way to celebrate than to provide you with another free pattern to download?
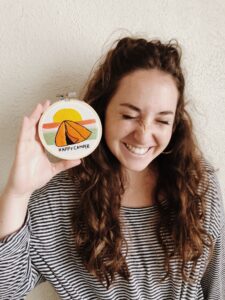
As my birthday gift to you, I’m sharing the pattern for one of my all-time favorite hoop designs: the Happy Camper!
Happy Camper Pattern
What stitches will I be using?
- This pattern only uses two primary stitches:
- The Satin Stitch
- The Back Stitch
Need a refresher? Reference my instructional guide on the Back, Satin, and Leaf stitches.
What materials do I need?
- 5-inch embroidery hoop
- Cotton or linen fabric
- Embroidery floss
- Size 5 needle
- Scissors
- Transfer pen/pencil
- Printed copy of the Happy Camper Pattern
What do I do with this pattern?
- Download the PDF to your computer.
- Print out the first page with the design.
- Prep a 5-inch embroidery hoop using the method from my Getting Started series.
- Using the lightbox technique, transfer the Happy Camper design onto your fabric.
- Loosen your hoop, flip your fabric, and re-stretch your design in your hoop.
- Gather your materials.
- Get stitching!
How did this pattern come to be?
Back in college, I was feeling very inspired by some friends’ spring break trip to Max Patch, which is a mountain in North Carolina. I saw so many of my peers camping and enjoying the beautiful sunrises and sunsets that this mountain range had to offer. Naturally, I decided that I needed to make a little hoop to commemorate such a lovely place.

I wanted this design to be simple, colorful, and something that I could theoretically complete in one sitting. This influenced my design choices. The decision to use only two stitches was born out of my desire for simplicity. Arguably, the satin and back stitches are two of the most approachable stitches in embroidery so, focusing on just these two made this design very quick to complete.
My favorite feature of this hoop is the use of the back stitch to create the sun. Rather than filling in with a satin stitch, I used rows of back stitches, fixed close together to create the sun. This technique also creates the appearance of sunbeams and adds a bit of texture to an otherwise solid design.
Please note that my guide for this pattern is simply that: a guide. You are more than welcome to choose different colors, add your own little flair to it, and really make it your own.


0 Comments