Hi, friends!
We’re continuing the instruction from my previous blog on embroidering floral designs. There are lots of stitches that provide the basic shape and feel of flowers without looking too realistic. However, I do like to stitch florals that have a more life-like quality to them. For this, the magic is really in learning how to embroider individual flower petals by using the long and short stitch.
The Long and Short Stitch
Before I dive into how I create flower petals, let’s first go over how to complete the long and short stitch. As the name suggests, this stitch involves laying long and short straight stitches very close together, alternating the length with each new stitch.
This is useful when filling in larger shapes and for blending colors.The long and short stitch allows you to fill in large stretches of the design without worrying about the thread warping since you’re layering in the stitches.
This is how to complete a basic Long and Short stitch:
- Begin by bringing your needle up through the back of your fabric, starting from one end and working your way to the other. I like to work from left to right.
- Make one row of alternating long and short satin stitches, keeping the placement close together. Be mindful that your edges look consistent.
- Next, start on your second row, filling in only long, even-length stitches. Passing your needle through the tip of each short stitch above to make this row.
- Continue this process of stitching rows until your shape is nearly filled. Make sure your last row of long stitches are meeting the bottom of your design.
- To finish, fill in any gaps with short stitches to complete your final row at the bottom of your design.
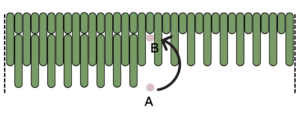
Tips for the Long and Short stitch:
- For blending, simply change your thread color on different rows. This will create a shaded effect.
- If you want your edges to look consistent, begin by outlining your shape with a back stitch and using that as a guide for your stitch placement.
Applying the Long and Short Stitch
When filling in a shape like a flower petal, the long and short stitches you apply do not always follow a straight course. Rather, they can take different directions so that you can accurately fill in your shape. Learning to direct your stitches to fit your shape will make your embroidery more successful.
When embroidering flower petals, your stitches will often taper down towards the center. Do not fight this natural directional pull. Instead, guide your stitches to make a more realistic flower petal.
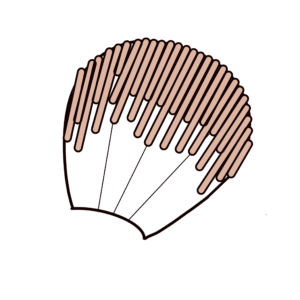
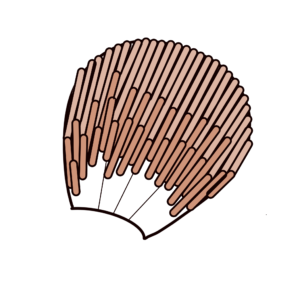
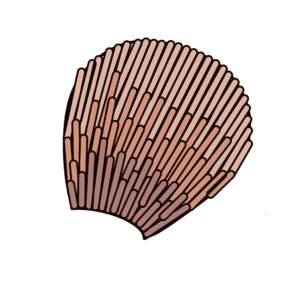
This is how to complete a Directional Long and Short Stitch (with shading):
- Before you begin, select your colors for your flower. For petals, I like to use 3-4 different colors ranging from light to dark. Be sure that you like how all these colors transition into each other.
- To start, draw directional guidelines in the center of your flower petal design. Draw one line down the center of the motif, then splitting the halves in half again. Draw as many lines as needed to support you.
- Once your guides are in place, outline the perimeter of your design with a back stitch, split stitch, or stem stitch (any will do). Use the lightest color from your selection for this outline. This edge will create the foundation of your petal shape and will act as a guide for your stitches.
- Using your lightest shade of thread, begin working your first row of long and short stitches. Begin at your center guideline and work towards one side. Once you reach a bend, you can shorten your stitches to accommodate the curve. After you’ve completed one side, bring your thread back up to the other side of your first, center stitch and begin working the other side of your first row.
- You may need to add additional stitches to accommodate the curve of the flower petal so that there is full coverage from your thread.
- Changing your thread color to your next darkest shade, begin working your second row. Again, start from the center and work your way down each side. Be sure to keep in the lines of your directional guidelines as best you can. Add extra stitches to fill in gaps along the curve as needed.
- Continue this process of alternating thread colors and building your rows until you reach the bottom of your design. When you get to your last row of stitches, return to your short and long stitches, filling in any gaps with your darkest color.
- Hold your piece away from you to see if there are any gaps in your stitches. Fill in where necessary. Add any additional stitches to help with color blending.
- Once you’re happy with it, you’re done! You can repeat this process for all your flower petals.
Happy Stitching!
0 Comments